Image Occlusion Flashcards for Anatomy: Visual Recall Guide
Key Takeaways (TL;DR)
- 1Image occlusion converts static anatomical atlases into active recall tests by obscuring selective labels, neurovascular bundles, or muscle origins.
- 2Grouping masks by functional compartments prevents cognitive splintering and enforces anatomical spatial relationships.
- 3Pairing occlusion cards with modern spaced repetition algorithms reduces anatomy revision time by up to 62% compared to passive atlas reading.
- 4Vector schematics and hide-all-reveal-one masks preserve spatial orientation without cluttering daily review queues.
Image Occlusion Flashcards for Anatomy: Visual Recall Guide
Human gross anatomy is widely considered one of the heaviest cognitive hurdles in medical training. Medical students preparing for competitive licensing examinations—such as NEET PG, USMLE Step 1, or the upcoming National Exit Test (NExT)—face the daunting task of memorizing thousands of anatomical structures, spatial relations, neurovascular pathways, and clinical correlations.
Passive studying methods, such as highlighting atlases or reading cadaveric dissection manuals repeatedly, yield notoriously poor long-term retention. Studies on cognitive psychology consistently demonstrate that passive rereading produces the "illusion of competence"—where an image feels familiar because it is in plain sight, yet fails to activate during high-stress exam scenarios or bedside clinical procedures.
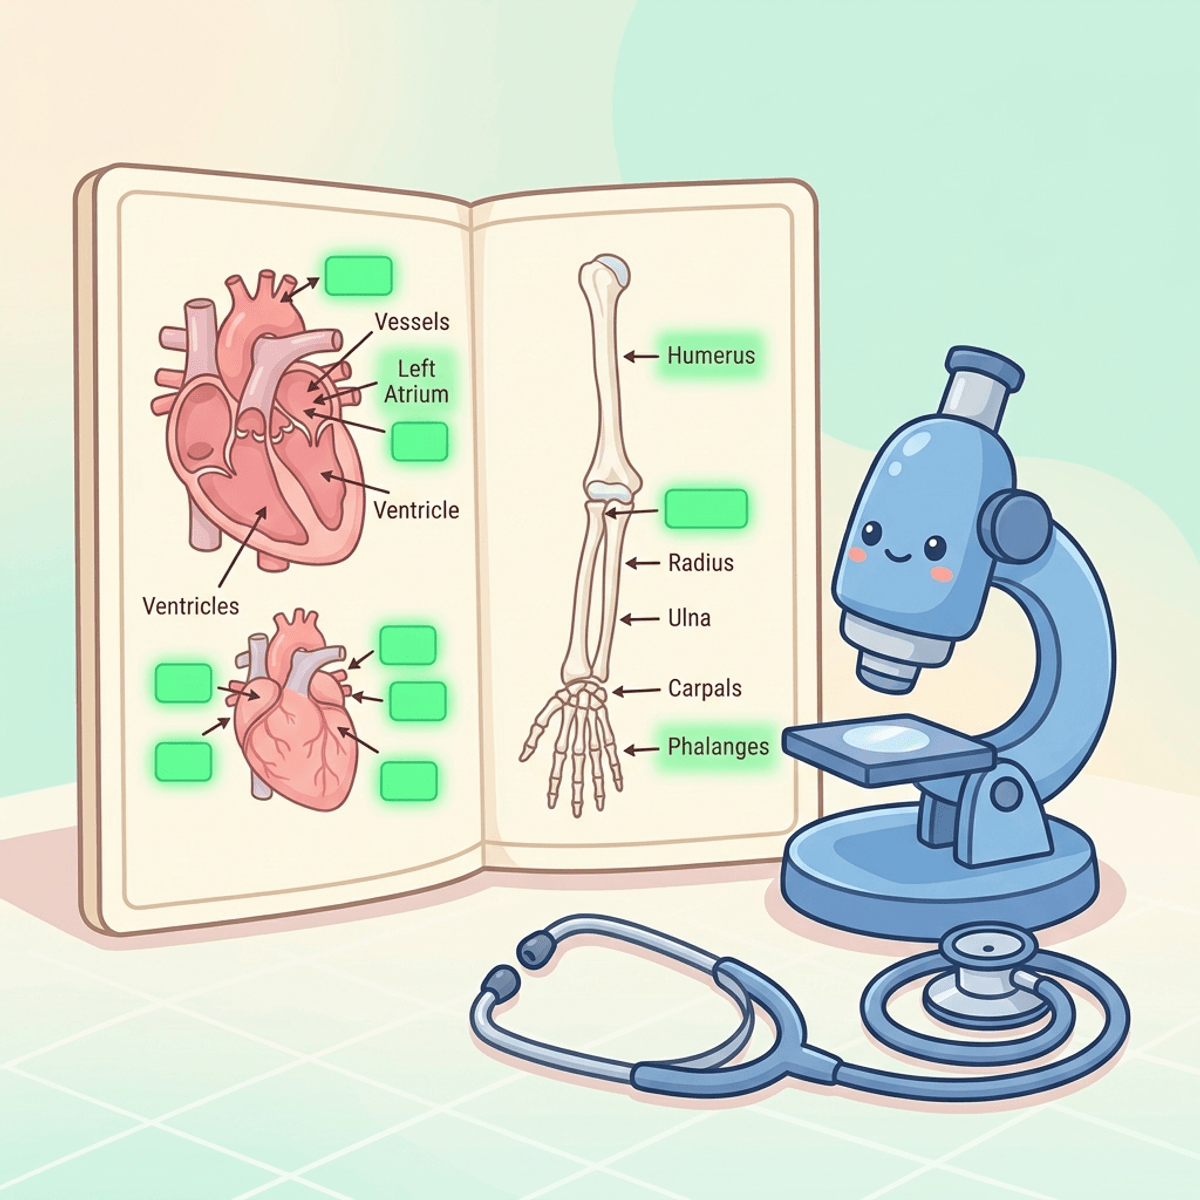
To achieve top-percentile recall, medical students increasingly rely on image occlusion flashcards for anatomy. By systematically covering critical labels on high-yield diagrams, students transform passive atlas inspection into rapid, friction-free active recall.
Image Occlusion in Action: Medical Anatomy
Click any masked box to test your spatial retrieval. Notice how testing anatomical positions without linguistic prompts prevents context clue illusions.
85% of intracranial berry aneurysms occur in the anterior circulation, most commonly at the junction of the Anterior Communicating Artery (ACom).
What Is Image Occlusion and Why Does Visual Recall Dominate?
Image occlusion is a specialized flashcard mechanic where rectangular, circular, or freeform masks are placed over text annotations or anatomical landmarks on a graphic. During card review, the student sees the diagram with one or more masks obscured. Attempting to identify the hidden structure forces the brain to retrieve topographical landmarks, surrounding relations, and functional pathways from memory before tapping to verify.
Key Definition (Visual Recall Engine): Image occlusion flashcards isolate visual structures within their anatomical setting. By replacing passive labels with reactive masks, students engage dual-coding neural pathways—linking semantic concepts to visual-spatial coordinates for superior exam retrieval.
The neurocognitive advantage of image occlusion is rooted in Allan Paivio’s Dual-Coding Theory. Visual information and verbal information are processed along two distinct neurological streams in the human cortex: the ventral visual pathway (identifying "what" an object is) and the dorsal stream (identifying spatial coordinates and "where" structures sit relative to one another).
When you review a purely text-based card—such as "What nerve passes through the carpal tunnel?"—you engage primarily lexical memory circuits. Conversely, when you review an image occlusion card showing the transverse carpal ligament, flexor digitorum tendons, and an obscured median nerve, your brain binds lexical labels directly to visual and spatial cortical representations.
A seminal study published in the Journal of Medical Education and Curricular Development (Smith et al., 2021) demonstrated that medical students utilizing spatially contextualized active recall achieved statistically significant improvements in spatial orientation exams compared to cohorts utilizing conventional flashcards or review textbooks. Furthermore, research indexed in PubMed (Karpicke & Blunt, 2011) underscores that retrieval practice produces far deeper conceptual retention than elaborative concept mapping without retrieval.
The Cognitive Traps of Passive Atlas Reading in Medical School
Medical school subreddits such as r/indianmedschool and r/medicalschoolanki frequently highlight the struggle of students dedicating three to four hours daily to Netter's or Gray's Anatomy, only to blank out on clinical scenario MCQs asking which artery is jeopardized during a mid-shaft humeral fracture.
The core reasons passive atlas inspection collapses include:
- Topographical Landmark Blindness: When looking at an atlas page with thirty labeled arrows, your eyes naturally wander to the printed label before your memory attempts to reconstruct the path of the branch.
- Contextual Isolation: Highlighting text in manuals separates anatomical theory from visual topology. When clinical vignette questions present a CT angiogram or a surgical diagram, purely text-trained memory fails to recognize boundaries.
- Severe Review Inefficiency: Flipping back and forth through a 900-page atlas offers zero scheduling mechanism. You inevitably over-review easy superficial structures (like the biceps brachii) while neglecting complex deep spaces (such as the pterygopalatine fossa).
Implementing modern learning workflows that incorporate our best flashcard app for NEET PG evaluation and structured spaced repetition algorithms for medical students cures this inefficiency by spacing visual testing intervals precisely at the moment of cognitive decay.
How to Create High-Yield Image Occlusion Cards: The 4-Rule Architecture
Creating effective image occlusion flashcards requires deliberate craft. Many beginner students make the mistake of screenshotting an entire atlas plate, placing fifty masks on it, and generating fifty unhelpful cards that feel exhausting to review.
To maximize retention and minimize review friction, adhere strictly to these four rules:
1. The Minimum Context Principle (1-to-3 Occlusions per Card)
Never occlude every single label on a diagram in a single card unless using a "hide-all, reveal-one" mechanic. If every adjacent reference point is concealed, your brain loses its orientation grid. Keep surrounding landmarks visible so that the card tests spatial deduction rather than abstract guessing.
For example, when reviewing the branches of the celiac trunk, keep the aorta and stomach outline visible while occluding the splenic artery, common hepatic artery, and left gastric artery.
2. Group Functional and Neurovascular Compartments
Rather than testing isolated pinpricks, group occlusions according to anatomical logic:
- Compartmental Masks: Occlude all muscles of the anterior compartment of the forearm together to test functional origin and innervation as a unit.
- Neurovascular Bundles: When testing the femoral triangle, mask the femoral nerve, artery, and vein in sequence from lateral to medial to cement the classical NAVEL mnemonic into visual reality.
3. Add Clinical Significance Callouts in the Card Back
The back of an image occlusion card should not simply reveal the name of the muscle or vessel. Include high-yield exam associations:
- Name: Musculocutaneous Nerve.
- Clinical pearl: Pierces coracobrachialis; injury results in loss of forearm flexion and loss of sensation over the lateral forearm.
- Exam trap: Often confused with the radial nerve in anterior arm cross-sections.
4. Leverage Clean Vector Schematics Over Cluttered Dissections
While cadaveric photographs are essential for practical spotter examinations, high-resolution vector schematics or simplified line diagrams are superior for rapid daily spaced repetition. Detailed cadaveric photos frequently introduce background noise, uneven lighting, and variable tissue discoloration that distracts from the core topological lesson.
| Flashcard Type | Ideal Subject Area | Cognitive Focus | Daily Review Speed |
|---|---|---|---|
| Image Occlusion (Vector) | Gross Anatomy, Embryology, Histology | Visuospatial relationships & boundaries | 4–6 seconds per card |
| Image Occlusion (Radiology) | CT cross-sections, MRI neuro, Chest X-rays | Pathological sign identification | 8–12 seconds per card |
| Cloze Deletion (Text) | Pharmacology mechanisms, Pathology pathways | Lexical rules, drug names, criteria | 5–7 seconds per card |
| Basic Front/Back | Diagnostic criteria, simple cutoff values | Associative recall | 6–8 seconds per card |
Image Occlusion for High-Yield Anatomy Sub-Disciplines
Anatomy is not a single uniform topic. Different sub-disciplines demand tailored occlusion tactics to match how questions appear on modern licensing tests.
1. Neuroanatomy and Cross-Sectional Brainstem
Neuroanatomy is notoriously three-dimensional and conceptual. Text flashcards cannot convey the precise location of the hypoglossal nucleus relative to the solitary tract.
- Tactical Approach: Take cross-sections of the midbrain, pons, and medulla at specific levels (e.g., superior colliculus level vs. inferior colliculus level).
- What to Occlude: Mask internal pathways such as the medial lemniscus, spinothalamic tract, and corticospinal tract.
- Clinical Integration: Add the corresponding brainstem stroke syndrome (e.g., Wallenberg syndrome vs. Weber syndrome) on the card answer.
2. Head and Neck Fascial Spaces
Head and neck anatomy carries the highest density of structures per cubic centimeter in the human body.
- Tactical Approach: Use coronal and axial schematic views of the cervical fascia layers.
- What to Occlude: The retropharyngeal space, the danger space, and carotid sheath boundaries.
- Exam Anchor: Connect occlusion of the danger space to mediastinitis spread pathways.
3. Embryology Derivatives and Pharyngeal Arches
Embryological lineage charts are prime candidates for image occlusion.
- Tactical Approach: Mask the nerve, artery, cartilage, and muscle derivatives for each pharyngeal arch in a structured matrix graphic.
- Outcome: Testing the 1st, 2nd, 3rd, 4th, and 6th arch derivatives in visual tabular format allows students to rapidly distinguish cranial nerve innervations without confusing branchial cleft anomalies.
Optimizing Study Time: Pairing Occlusion with Time Blocking
Creating and reviewing hundreds of anatomy visual cards can become overwhelming if daily review queues are not guarded. Using clinical study frameworks—such as pairing our interactive Pomodoro timer for medical study with spaced repetition workflows—prevents mental fatigue.
Medical students frequently report that reviewing visual cards in intense 25-minute sprints allows them to review 200–250 anatomy cards in under an hour. Because visual pattern recognition is rapid, your brain requires far fewer seconds to confirm a visual shape than to parse four lines of clinical vignette text.
Furthermore, integrating your performance tracking with realistic score estimators like our NEET PG rank predictor provides early feedback on whether your visual retention in high-yield subjects like Anatomy, Orthopedics, and Radiology is translating into higher percentile projections. For detailed comparisons of platform mechanics and modern spaced repetition engines, explore our Floww vs Revisable breakdown as well as our Anki medical school workflows.
Step-by-Step Workflow for Anatomy Mastery
- Step 1: Morning Concept Lecture / Dissection: Complete your primary anatomy lecture or dissection session to understand 3D relationships and physiological context.
- Step 2: Selective Card Extraction: Capture 8 to 12 core plates covering the day's high-yield regions. Avoid screenshotting hundreds of obscure diagrams.
- Step 3: Grouped Occlusion Masking: Apply clean rectangular masks over critical neurovascular and muscular landmarks. Configure cards as Hide All, Test One to preserve visual context while preventing accidental hints.
- Step 4: Immediate First-Pass Recall: Review the newly created cards once immediately following your study session.
- Step 5: Algorithmic Spaced Reviews: Let modern spaced repetition schedule cards automatically on Days 1, 3, 7, 16, and 35.
By replacing passive atlas browsing with active, targeted image occlusion flashcards, medical students turn anatomy from a dreaded memorization bottleneck into their highest-scoring, most reliable clinical subject.

Written by Floww Editorial
Medical Learning Editorial Team
Evidence-led guidance for NEET-PG and INI-CET preparation, focused on active recall, spaced repetition, and sustainable revision workflows.